Add an individual Flattr button to your Tumblr posts
Finally, an update to my original tutorial - cleaned it up, added some screenshots, improved the JS a little bit. Having a proper place for this was one my reasons to start this blog in the first place…
First of all: the whole procedure will only take about 10 to 15 minutes depending on your theme and skills. If you think you cannot do it alone: don’t worry, you will get help. Read the tutorial first and afterwards decide how you want to proceed.
Secondly, this tutorial describes how to modify your theme to show an individual Flattr button for each single one of your postings on Tumblr - if all you want is one Flattr button for your whole tumblelog it is even easier:
a) generate the code for that button manually and b) paste it into your blog’s description.
One last thing I want to stress before getting to it: You should always link to your source if you can. Give proper credit when possible. Don’t make people believe something is your own creation unless it is. All of these are true and important in any case, but considering money comes into play I had my doubts about publishing this tutorial. Thus wanted to at least include this little reminder.
As Tumblr does not provide the possibility to include plugins, we need to make use of the theming possibilities they provide. The Flattr button comes via JavaScript, so it’s pretty easy to integrate.
Step 1 - add the JS to your blog’s <head>
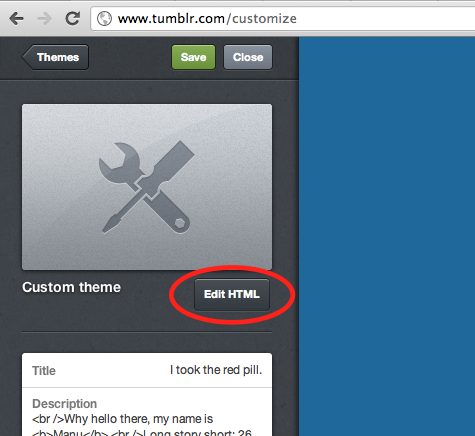
Go to the Customize options and look for the Edit HTML button.
Now search for </head> to find the end of the HTML HEAD section:

Directly before it, simply paste the following code snippet:
<script type="text/javascript">
/* <![CDATA[ */
    (function() {
        var s = document.createElement('script'), t = document.getElementsByTagName('script')[0];

        s.type = 'text/javascript';
        s.async = true;
        s.src = 'http://api.flattr.com/js/0.6/load.js?mode=auto';

        t.parentNode.insertBefore(s, t);
    })();
/* ]]> */
</script>
You might want to check here to see if 0.6 is still the latest version.
Step 2 - add the actual button to the individual postings’ section
Now you’ll need to figure out where to put the button - this requires some very basic HTML knowledge. In case you need assistance: write a comment, ask me on Twitter or use Stack Overflow. I’ll be glad to help you with perfecting the integration.
You need to put the code somewhere between {block:Posts} and {/block:Posts}, which is where the formatting of a post is defined. The exact positioning depends on your theme, obviously. You could try checking where inbetween those two tags the permalink is displayed by searching for {Permalink}. The Flattr button might fit near that region.
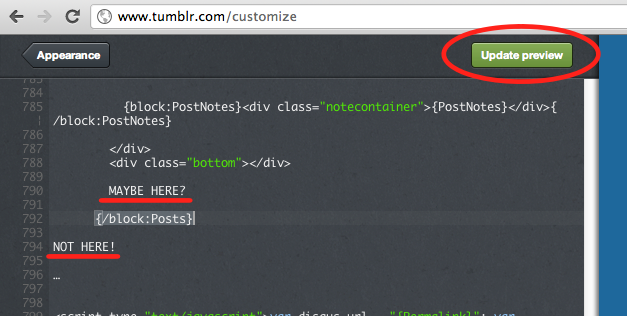
The live preview function of the theme editor will help you figuring the ideal placement. Once you inserted the code, click on Update preview to see if it looks alright. If not, make use of what you see to slowly figure out what you need to tweak. As I said - if you need help with that, don’t hesitate to ask. For someone who does things like that on a regular basis it is a matter of a few minutes or less, so please don’t waste your own precious time just because you don’t want to ask for help.
The actual code you need to insert is this:
<div class="flattr">
	<a class="FlattrButton" style="display:none;"
	    title="{PlaintextTitle} #{PostID}"
	    data-flattr-uid="YOUR-USERNAME"
	    data-flattr-button="compact"
	    data-flattr-tags="tumblr{block:Tags},{Tag}{/block:Tags}"
	    data-flattr-category="rest"
	    data-flattr-lang="en_GB"
	    href="{Permalink}">
	    {block:Text}{PlaintextBody}{/block:Text}
	    {block:Photoset}
	        Photoset ({PhotoCount}){block:Caption}:
	            {PlaintextCaption}{/block:Caption}
	    {/block:Photoset}
	    {block:Photo}Photo: {PlaintextCaption}{/block:Photo}
	    {block:Audio}
	        Audio{block:Caption}: {PlaintextCaption}{/block:Caption}
	    {/block:Audio}
	    {block:Chat}
	        {block:Lines}
	            {PlaintextName}: {PlaintextLine}
	        {/block:Lines}
	    {/block:Chat}
	    {block:Answer}
	        Question: {PlaintextQuestion}
	        Answer: {PlaintextAnswer}
	    {/block:Answer}
	    {block:Quote}
	        {PlaintextQuote} - {PlaintextSource}
	    {/block:Quote}
	    {block:Link}
	        {PlaintextName}{block:Description}:
	            {Description}{/block:Description}
	    {/block:Link}
	    {block:Video}
	        Video{block:Caption}: {PlaintextCaption}{/block:Caption}
	    {/block:Video}
	</a>
</div>
Step 3 - the final touch
You will need to make at least one modification to this code after copying & pasting it, but the other two are highly recommended as well.
- You have to insert your own Flattr username in the
data-flattr-uidline where it currently says YOUR-USERNAME. (Well, duh!) It will not work unless you do so. - Set your (main) language in the
data-flattr-langline. The tutorial defaults to en_GB, simply replace that value with your actual language code, here is a list. - Decide which button you want to use - compact or classic. If you don’t do anything, this tutorial will result in the compact button! To switch to classic, all you need to do is deleting the
data-flattr-button="compact"line completely.
In case you want the button placed on the right rather than the left replace the first line with:
<div class="flattr" style="float: right;">
Alright, that’s about it. Now you should have an individual Flattr button on all your Tumblr-posts. It’s not perfect, due to the limits of how we are “hacking” this into Tumblr. There are probably still some flaws, so if you encounter anything you consider a bug or you dislike, please let me know and I will see if it can be resolved. Apart from that: enjoy your shiny new buttons!